Home Networking. Part 2 – Foundational Configuration.
Now that the UniFi Security Gateway, or USG, and switches were online and updated to the latest firmware, I was anxious to really start using my VeloCloud Edge. I have access to a VeloCloud Orchestrator that is hosted and managed by VMware. But as an Enterprise Administrator, I can only configure and monitor Edges in a customer environment. There was a lot to the platform that I hadn’t seen. I would have Operator privileges in my own environment!
However, my home lab wasn’t ready because the VeloCloud Orchestrator, or VCO, is distributed as an OVF that requires vCenter to setup the VCO before it boots. I was hoping that I could deploy the OVF through the direct host management that I had been using. I gave it a try and was able to deploy the OVF. However, because I was not deploying through vCenter I wasn’t able to set the host name, password, or SSH keys. After the VCO booted up, I couldn’t log in or do anything. I deleted the VM and turned my attention to VLANs.

Velocloud OVF Configuration
Because the UniFi switches are only layer 2 capable, they cannot route traffic between VLANs. This means all inter-VLAN traffic must be routed through the USG. Because I planned to have at least 5 separate VLANs, I began to feel concerned about the CPU utilization on the USG. It already would be performing DPI and other security features. Now, it will need to route most of the packets on my network. At the time of writing this, less than 25% of my devices are online. Every day a few more are connected. It will be interesting to how chatty these devices are with just a few human users. Here is the latest usage chart. CPU is sitting at about 25% with a few devices streaming and a couple of people using cell phones and laptops.

USG Performance Chart
Setting up VLANs in the controller software is very easy. It’s configuring firewall rules that I find to be kludgy because they give you about 6 different ways to make the same thing happen. For software that is for home and small/medium business use, I think they should make this simpler and more intuitive. In the screenshot below you see I am creating a new network named Demo. I typed in 10.10.200.1/24, and it automatically populated everything below the Gateway/Subnet box. If the UniFi Site is setup with the correct DHCP and DNS servers, you won’t need to change those settings unless you wish. You’ll notice there are multiple purposes when creating a new network. To create a VLAN as one might expect to use it in an enterprise environment, select Corporate.

Network Creation in UniFi Controller
A network set with the Guest Purpose is used for Guest networks where you do not want those devices to access everything such as visitors who want to use Wi-Fi instead of data on their phones. If you want to use tokens or hotspot authentication, that is built into the guest profile and enabling it takes only a few clicks. This is certainly easier than manually setting up those firewall rules.
After creating VLANs for the different types of devices I would have on my network, it was time to prevent communication between the VLANs where it is unnecessary. When I looked at the site settings for routing and firewall, I was amazed. Why does it need to be so complicated? Nine different places I could create a rule seems excessive. To make matters worse, members of the Ubiquiti community give misinformation in the forums as to how to create a firewall rule such as creating an “IN” rule when there should truly be an “OUT” rule. I don’t think this is their fault, it is due to how the GUI is built and possibly to how the USG handles rules. For example, you must create the rules in order in the GUI that you wish for them to be enforced by the USG. You do not get to edit them to reorder them or even set the rule index during creation. This is just silly. There is more flexibility in the CLI, but then we have to get JSON involved for the settings to be remembered whenever the USG is rebooted or provisioned with a new setting. I would suggest a different product if you want simple firewall management at home. I don’t know what that would be. It seems a lot of people like pfsense. I’ve never used it, so I can’t recommend or not recommend.

UniFi Firewall Rules
It has been a very long time since I did anything that resembled real network administration. Many years ago, I spent a few days in San Jose to take Cisco ACE training. I am pretty sure administering the ACE was more intuitive than creating firewall rules in the USG’s GUI. This is saying a lot. But I prevailed and my IoT devices no longer had access to internal systems or the internet. No botnets coming from my house! Not that they’d have the bandwidth to do much destruction to the world.
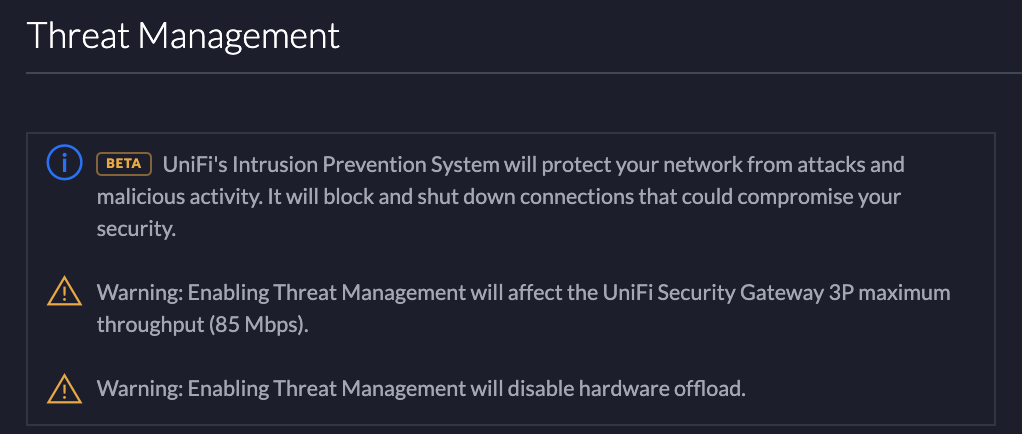
USG Threat Management
Another feature that I’ve decided to turn on in the USG is Threat Management. We all accidentally click a wrong link every so often. Limiting my internet speed to 85 Mbps? No problem! This is another opportunity to look closely at the specs of the USG Pro if you can pull more than 80 Mbps. Since I do not have a Pro, I don’t know what its throughput would be reduced to.
I thought I was finally ready to install vCenter. But alas, I didn’t have a DNS server running on my network. And if I’m going to have a home lab with a bunch of VMs, I certainly need Active Directory. Creating a domain controller for a new forest in a home lab in 2020 is far less nerve-wracking than running DCPromo.exe in 2001 in an enterprise environment, that’s for sure!
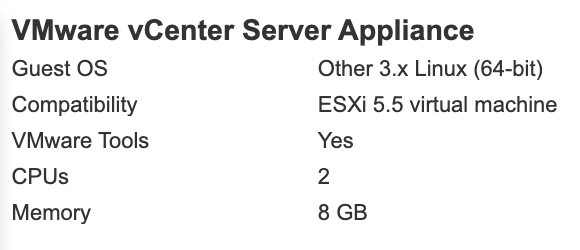
After creating A and PTR records in DNS, it was finally time for the VCSA. As all of you probably know, the tiny deployment of vCenter requires 10 GB of RAM. That certainly wasn’t going to fly with my hardware limitations!

Gaming PC ESXi Host
VCSA Config
My host came to a grinding halt. I reduced the VCSA to 6 GB of RAM. It could barely boot and could not load the UI. I set it to 8 GB, and at least it ran with minimal complaining long enough for me to deploy the VeloCloud Orchestrator. After that, it was shut down until it was time to deploy a VeloCloud Gateway and subsequently powered off after that.
I was certainly happy to see this login screen after going through host resource gymnastics!


VCO VM
A production VM of VCO wants more resources than my host can provide.
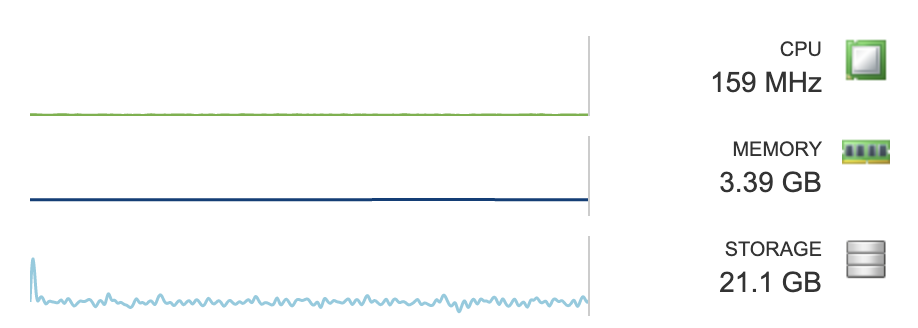
VCO VM Resource Consumption
Luckily, it is well behaved and only consumes what it needs while powered on.
One last note for before closing out this blog. VeloCloud Orchestrator must have a publicly accessible IP address. The default route must egress to the internet.

VCO OVF Network Selection
This means if you want to do this in your own environment at scale for true internet routing purposes, you might want to have a separate NIC that isn’t hidden behind NAT from something like, a USG for example! There will be many more things that you would need in addition to this, so it is unlikely that an individual would be running their own VCO instance for true SD-WAN multi-pathing into the world. But running it in your home lab to familiarize yourself with the platform behind a firewall and NAT is just fine.
Thank you for reading Part 2! Part 3 will address the VeloCloud architecture. I will describe what the individual components do and how they talk to each other.